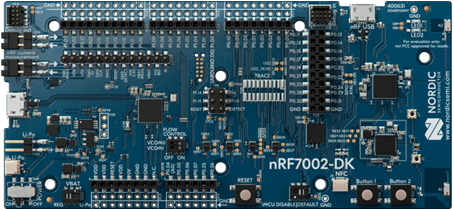
- Download the
nrf7002dk_merged.hexfile from the firmware directory. - Install nRF Connect for Desktop
- Use the Programmer application to program the Hex file onto your development kit.
NOTE: For programming, use the USB port on the left side of the picture above, which is connected to the on-board debugger/programmer.
Once programmed, you will use the USB port on the top right of the image above, which is connected to the nRF5340 chip on the board. This is where you will find the MicroPython REPL prompt.
The first time that you use the device you might need to create the filesystem. You can do that from the REPL prompt:
import os
from zephyr import FlashArea

block_dev = FlashArea(FlashArea.STORAGE, 4096)
os.VfsLfs2.mkfs(block_dev)
os.mount(block_dev, '/flash')
There are two buttons:
- Button 1: If pressed at boot time, the board will boot into the Bootloader (mcuboot) for firmware upgrades. During normal operation it can be used with
Pin.cpu.gpio1_8 - Button 2: If pressed at boot time, the board will skip executing a
main.pyfile from the filesystem. During normal operation, it can be used withPin.cpu.gpio1_9
There are two LEDs:
- LED1: Can be accessed with
Pin.cpu.gpio1_6 - LED2: Can be accessed with
Pin.cpu.gpio1_7
from machine import Pin

pin = Pin(Pin.cpu.gpio1_6, Pin.OUT)
For the nRF7002DK board, these are the available pins:
>>> Pin.cpu.gpio
gpio0_0         gpio0_1         gpio0_10        gpio0_11
gpio0_12        gpio0_13        gpio0_14        gpio0_15
gpio0_16        gpio0_17        gpio0_18        gpio0_19
gpio0_2         gpio0_20        gpio0_21        gpio0_22
gpio0_23        gpio0_24        gpio0_25        gpio0_26
gpio0_27        gpio0_28        gpio0_29        gpio0_3
gpio0_30        gpio0_31        gpio0_4         gpio0_5
gpio0_6         gpio0_7         gpio0_8         gpio0_9
gpio1_0         gpio1_1         gpio1_10        gpio1_11
gpio1_12        gpio1_13        gpio1_14        gpio1_15
gpio1_2         gpio1_3         gpio1_4         gpio1_5
gpio1_6         gpio1_7         gpio1_8         gpio1_9
>>> Pin.board.
A0              A1              A2              A3
A4              A5              D0              D1
D10             D11             D12             D13
D14             D15             D2              D3
D4              D5              D6              D7
D8              D9
The available bus is i2c1 and this is how you get an instance:
from machine import I2C

i2c = I2C('i2c1')
Most of the Python APIs for Wi-Fi access are the same as the existing MicroPython Wi-Fi APIs. Here is the documentation for the WLAN class
The auth parameter is required. You can use the the integers from network.AUTH_*, or use the value returned in the scan. For example:
nic.connect('ssid', 'passphrase', network.AUTH_WPA2_PSK)
The security field values are different for the Zephyr port:
- network.AUTH_OPEN
- network.AUTH_WPA2_PSK
- network.AUTH_WPA2_PSK_SHA256
- network.AUTH_WPA3_SAE
Return the current status of the wireless connection.
When called with no argument the return value describes the network link status.
The possible statuses are defined as constants:
STAT_IDLE-- no connection and no activity,STAT_CONNECTING-- connecting in progress,STAT_GOT_IP-- connection successful.
When called with one argument param should be a string naming the status parameter to retrieve. All the parameters refer to the access point that the device is currently connected to.
'rssi': RSSI of the current connection'ssid': SSID of the current connection'band': The frequency band being used, e.g. network.WIFI_BAND_2_4_GHZ'link_mode': The Wi-Fi generation. For example, 6 for Wi-Fi 6 (802.11ax)'channel': The channel being used'mfp': The current Management Frame Protection option. 0 - disabled; 1 - optional; 2 - required'security': The security being used.'bssid': Hardware address of the access point, in binary form, returned as bytes object.'dtim': The DTIM period of the access point.'beacon_interval': The beacon interval of the access point, in ms.'twt_capable': Whether the access point supports TWT for power savings.
Get or set general network interface parameters. These methods allow to work
with additional parameters beyond standard IP configuration (as dealt with by
WLAN.ifconfig()). These include network-specific and hardware-specific
parameters. For setting parameters, keyword argument syntax should be used,
multiple parameters can be set at once. For querying, parameters name should
be quoted as a string, and only one parameter can be queries at a time:
Following are commonly supported parameters:
'pm': WiFi Power Management setting (see below for allowed values)'wmm': 0 for Legacy power save mode, 1 for Wireless Multimedia (WMM)'wakeup': 0 for wakeup on every DTIM beacon, 1 to set a listen interval and skip beacons'listen_interval': Number of beacons to skip. For example, setting this to 10 will sleep for approximately 1 minute.'timeout_ms': The power save inactivity timer (in ms)
NOTE:
wmmandlisten_intervalparameters can only be changed when the device is not connected to an access point.
Set Target Wake Time. If the Access Point supports it, this allows the Station and
Access Point to negotiate how long to remain asleep (interval), and for how long
to be awake (wake_time). The callback is not yet implemented.
To stop using TWT and go back to the power savings settings in config, use the
teardown command.
